Simulation Options
Simulation Options opens the Simulation Options dialog to adjust simulation details.
If you hover over the Simulation Options icon, a description opens along with the command PMSimulationOptions. Typing this into the command box is another way to open the Simulation Options dialog.
There are two tabs available in the Simulation Options window: General and Animation.
Simulation Options - General
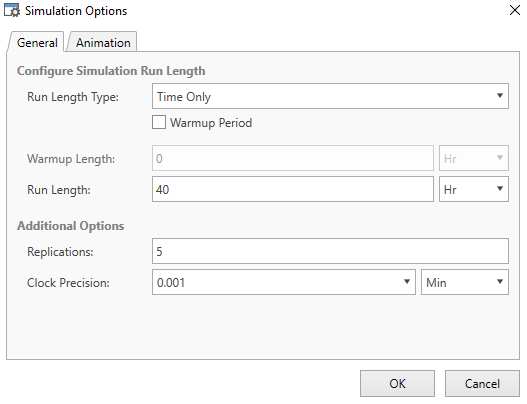
Use the General tab to edit the following information about your simulation:
Run Length Type - Set the simulation to be Time Only, Weekly Time or Calendar Date. Which option you choose depends on how long you want your simulation to run. Select the text box to see a menu.
Warmup Period - Toggle whether or not there should be a warmup period in your simulation. A warmup period is a length of time at the beginning of your simulation that passes before the rest of the simulation begins. How you define the length of your warmup period once you have checked the Warmup Period box depends on the Run Length Type:
- For a Time Only warmup length, enter a Warmup Length value to represent how long the warmup period should be. Note that there is a menu to choose the unit of time. Defaults to 0 Hr.
- For a Weekly Time warmup length, Week is set to 1 and you cannot change its value. However, you may select the weekday for the warmup to occur and the time. Select the Day menu to select a weekday for the warmup period to take place. Defaults to Monday. Use Time to determine at what time on your chosen day the warmup period occurs. Select the clock icon to see a table of options, which range from 12:00 AM to 11:30 PM at half hour intervals. You may also type in a more precise time manually. Defaults to 12:00 AM.
For a Calendar Date warmup length, change the value in Warmup Begin to reflect both the date and time for the warmup to occur. Note that the format is mm/dd/yyyy 00:00 AM/PM. You may also select the calendar icon to open a calendar and select your desired date and time. Defaults to the current date while using the program at 12:00 AM.
Simulation Begin and Simulation End - How you define when your simulation begins or ends also depends on whether your simulation is defined as a Time Only, Weekly Time, or Calendar Date type:
- For Time Only simulations, change the Run Length value to how long your simulation runs. Note that there is a menu to select the unit of time that you would like to use. Defaults to 40 Hr.
- For Weekly Time simulations, use Simulation Begin and Simulation End to define the simulation time span. The Week values define at which week the simulation begins and ends. Defaults to begin the first week and ends during the fifth week. The Day values determine on what weekday the simulation begins and ends. Select a Day to select a weekday. Defaults to begin on a Monday and ends on a Friday. The Time values determine at what time on your chosen day the simulation begins and ends. Select the clock icon to see a table of possible times, which range from 12:00 AM to 11:30 PM at half hour intervals. You may also type in a more precise time manually. Defaults to begin at 8:00 AM and ends at 5:00 PM.
- For Calendar Date simulations, use Simulation Begin and Simulation End to define the simulation time span. Change these values to reflect both the date and time when the simulation begins and ends. Note that the format is mm/dd/yyyy 00:00 AM/PM. You may also select the calendar icon to select your desired date and time. Defaults to begin on the current date at 8:00 AM and ends on the same day of the following month at 5:00 PM.
For Calendar Date simulations, select Adjust for Daylight Savings Time to set your simulation to adjust the start and end times when a Daylight Savings date occurs.
Replications - Use replications if your model includes variance and you want a larger sample size that you can easily view and compare. To add replications to your simulation, change the Replications value to reflect the number of replications. Defaults to 1, meaning only one version of your simulation runs. ProModel accepts any integer between 1 and 999.
Clock Precision - Determine how precise the Clock value function returns. Note that there is a menu to select which unit of time you generally like to use in your model. This unit of time is used whenever a unit of time is not specified in a Logic statement.
Simulation Options - Animation
Select the Animation tab to edit the following simulation animation options:
- Enable Animation - Choose whether or not an animation plays during your simulation. Selected by default. If cleared, the simulation completes as quickly as possible without waiting for an animation to play out, and you are immediately be asked to view the simulation results.
- Initial Animation Speed - Use the slider to adjust the starting animation speed. This setting determines where the gray rectangle in the speed bar begins when you start a simulation. Select and hold to drag the slider setting, or select the slider at the desired position. Defaults to 25.
- Pause Simulation - Set your simulations to pause at start until you press play.
- Show Trace - Set your simulations to display trace information right as they begin.
Select OK to save your Simulation Options changes. To close the Simulation Options dialog without saving your changes, select Cancel.